首页 > Python基础教程 >
-
UGUI实现4位验证码输入
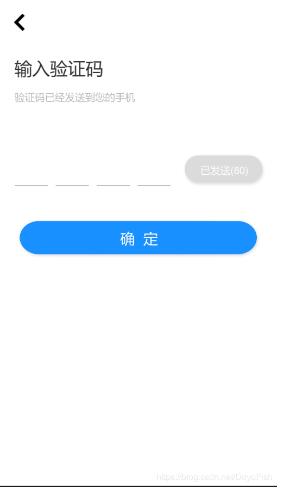
原本在电脑上开发一个验证码功能不是什么难题,4个InputField就搞定了,依次监听InputField的onValueChanged,当value.length == 1时跳转至下一个InputField,并ActiveField即可。

但是到了手机上,跳转至下一个InputField时,手机键盘会收缩,然后再弹出,然而,手机上的键盘如果间隔过短,会出现收回后不再弹出的情况。即使设置了0.2秒的间隔,也会因为手机键盘反复伸缩导致用户输入验证码出现间断感,极大降低了体验。
那么有没有办法实现这个功能呢?当然有啦!
虽然说NGUI完全可以通过设置字间距来完成,但是UGUI的InputField并没有这样的属性。因此,得通过一些黑科技来实现。
此外,其他大佬用代码实现了UGUI的InputField的字间距设置,但是本篇主要是讲述黑科技方法。
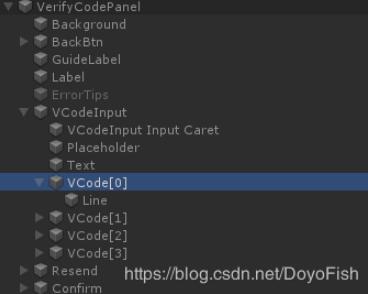
先看下这个预制体结构:

在这个InputField下添加了4个VCode(UnityEngine.UI.Text)组件,并在对应的下方添加了一个Line(Image)的子物体,用来做下划线。(每当一位验证码输入完成后,跳转至下一个Text组件显示新的验证码,切已输入的验证码的下划线变成蓝色)
是不是有思路了,没错,就是用4个Text组件来显示验证码,而InputField这是用来接收用户输入而已(不显示输入结果)。
这样的情况下,不会因为跳转InputField导致手机键盘反复伸缩或间隔过小而导致手机键盘不再弹出等问题。
每当用户输入的验证码位数发生变化,则将对应的位数赋给对应的Text,这样就做到了只使用1个InputField来输入4位验证码,而无需关心验证码之间的间距长度了。
既然逻辑构思好了,代码就不难了。
|
1
2
3
4
5
6
7
8
9
10
11
12
13
14
15
16
17
18
19
20
21
22
23
24
25
26
27
28
29
30
31
32
33
34
35
36
37
38
39
40
41
42
43
44
45
46
47
48
49
50
51
52
53
54
55
56
57
58
59
60
61
62
63
64
65
66
67
68
69
70
71
72
73
74
75
76
77
78
79
80
81
82
83
84
85
86
87
88
89
90
91
92
|
using System;using System.Collections;using System.Collections.Generic;using System.Text;using UnityEngine;using UnityEngine.EventSystems;using UnityEngine.UI; public class VerifyCodePanel : ILoginChild{ public const int VERIFY_CODE_LENGTH = 4; public InputField VCodeInput; public Text[] VCodes = new Text[VERIFY_CODE_LENGTH]; //外部选择蓝色与灰色,分别表示已输入(Blue)和未输入(Gray) public Color Blue; public Color Gray; private int m_lastVcodeLength = 0; void Start() { //外部设置VCodeInput等组件,或使用代码获取,这必须在初始化或之前设置完成 //UIUtility是自己实现的一个针对UI组件获取与绑定的一个工具 VCodeInput = UIUtility.GetChildControl<InputField>("VCodeInput", transform); BindUIEvents(); } private void BindUIEvents() { //绑定VCodeInput的值变化,外部绑定和代码绑定皆可,这里使用的是自己实现的一个UI工具 UIUtility.BindUIEvent(EventTypeEnum.InputFieldOnValueChanged, OnVCodeValueChanged, VCodeInput.transform); } // 监听输入的字符变化 private void OnVCodeValueChanged(string value) { //外部已经设置好VCodeInput的长度限制,最多为4,但是为了避免意外情况,限制字符长度 if (value.Length < 0 || value.Length > 4) { return; } //判断字符是边长了还是变短了,用以决定Text的跳转方向 bool next = false; //分割字符,默认为空,如果是长度增加,则说明输入了新的验证码,将这个验证码记录下来 string character = string.Empty; //比较与上一次输入的验证码长度,缺省长度为0 if(value.Length > m_lastVcodeLength) { next = true; character = value[value.Length - 1].ToString(); } m_lastVcodeLength = value.Length; int which = value.Length - 1; OnMoveCursor(next, which, character); } //移动光标(实际上是操作用来显示验证码的Text) private void OnMoveCursor(bool next, int which, string character) { //将值赋给对应的Text if (next) { VCodes[which].text = character; SetLineColor(which, Blue); } else { /*这里比较绕,如果是回退,则说明当前的which其实是已经退格后的位数, * 比如说,原本是输入了123,退格后则变成了12, * 那么which的值为value.length - 1 = 1; value.length为2 * 而我们需要将原本第三位(从0开始计数,值为2)的Text设置为空 * 因此需要i + 1,而为了避免用户全选并删除所有验证码的情况,需要遍历 */ for (int i = which; i < VERIFY_CODE_LENGTH - 1; ++i) { VCodes[i + 1].text = character; SetLineColor(i + 1, Gray); } } } //设置相应Text的Line的颜色 private void SetLineColor(int which, Color color) { VCodes[which].transform.GetChild(0).GetComponent<Image>().color = color; } } |


