当前位置:
首页 > Python基础教程 >
-
【python技巧】替换文件中的某几行
【python技巧】替换文件中的某几行
1. 背景描述
最近在写一个后端项目,主要的操作就是根据用户的前端数据,在后端打开项目中的代码文件,修改对应位置的参数,因为在目前的后端项目中经常使用这个操作,所以简单总结一下。
|
|
1. 文件路径:./test.c |
|
|
2. 文件内容 |
|
|
…… |
|
|
case EPA: |
|
|
chan_desc->nb_taps = 7; |
|
|
chan_desc->Td = .410; |
|
|
chan_desc->channel_length = (int) (2*chan_desc->sampling_rate*chan_desc->Td + 1 + 2/(M_PI*M_PI)*log(4*M_PI*chan_desc->sampling_rate*chan_desc->Td)); |
|
|
sum_amps = 0; |
|
|
chan_desc->amps = (double *) malloc(chan_desc->nb_taps*sizeof(double)); |
|
|
chan_desc->free_flags=chan_desc->free_flags|CHANMODEL_FREE_AMPS ; |
|
|
|
|
|
for (i = 0; i<chan_desc->nb_taps; i++) { |
|
|
chan_desc->amps[i] = pow(10,.1*epa_amps_dB[i]); |
|
|
sum_amps += chan_desc->amps[i]; |
|
|
} |
|
|
|
|
|
for (i = 0; i<chan_desc->nb_taps; i++) |
|
|
chan_desc->amps[i] /= sum_amps; |
|
|
|
|
|
chan_desc->delays = epa_delays; |
|
|
chan_desc->ricean_factor = 1;//待修改位置 |
|
|
chan_desc->aoa = 0;//待修改位置 |
|
|
chan_desc->random_aoa = 0;//待修改位置 |
|
|
chan_desc->ch = (struct complexd **) malloc(nb_tx*nb_rx*sizeof(struct complexd *)); |
|
|
chan_desc->chF = (struct complexd **) malloc(nb_tx*nb_rx*sizeof(struct complexd *)); |
|
|
chan_desc->a = (struct complexd **) malloc(chan_desc->nb_taps*sizeof(struct complexd *)); |
|
|
…… |
2. 单行修改-操作步骤
- 读取文件 使用python中的open()函数进行文件读取,将数据存储在缓冲区。
|
|
#1. 读取文件 |
|
|
path='./test.c' |
|
|
with open(path, 'r') as file: |
|
|
file_content = file.read() |
-
查找文件替换位置 以查找
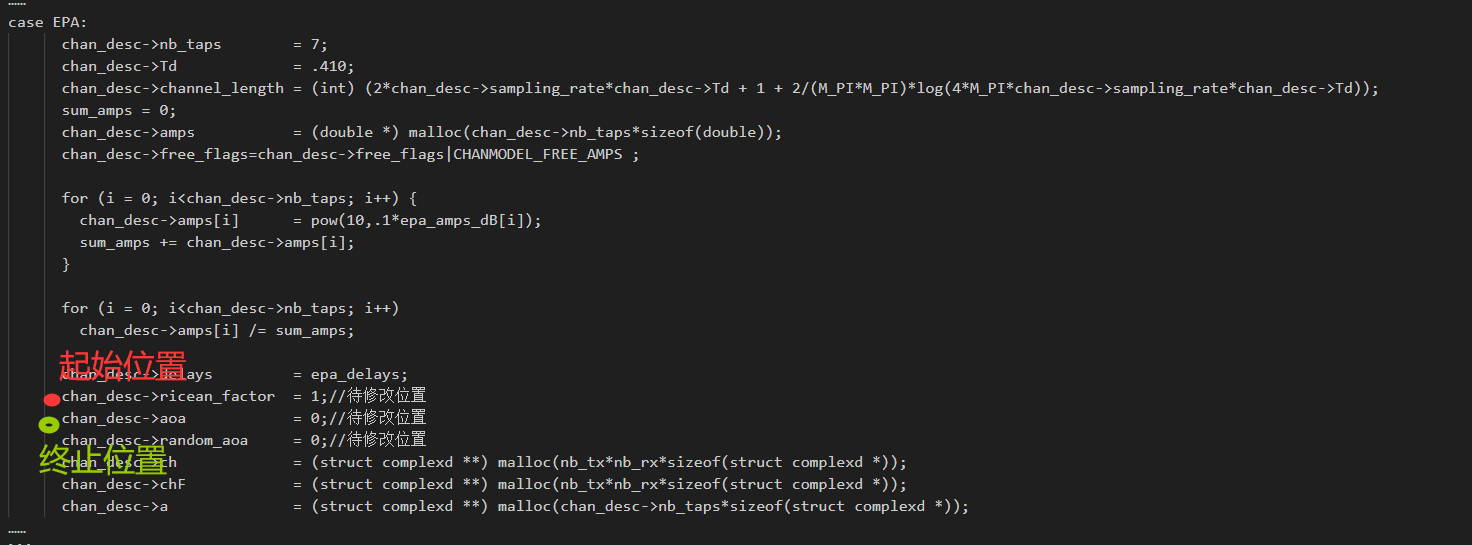
chan_desc->ricean_factor = 1;//待修改位置为例,查找这句话的起点和终点。
|
|
## 注:此步骤需要import re |
|
|
#2. 查找文件替换位置 |
|
|
start_index=file_content.find('chan_desc->ricean_factor = ')#起点 |
|
|
end_index=file_content.find('chan_desc->aoa = ',start_index)#终点 |
|
|
if end_index==-1 or start_index==-1: |
|
|
print('未找到待修改位置') |
|
|
#此时得到的两个指针,分别指向了待修改位置的起点和终点,如下图所示: |

- 设置替换文件内容 假设目前只修改这一行的参数,
|
|
#3. 设置替换文件内容 |
|
|
ricean_factor=3#假设这是要修改的参数信息 |
|
|
updata_content=file_content[:start_index]#获取这行代码之前的内容 |
|
|
update_content+='chan_desc->ricean_factor = '+str(ricean_factor)+';//待修改位置'#修改这行代码 |
|
|
update_content+=file_content[end_index:]#获取这行代码之后的内容 |
|
|
#此时得到的update_content就是修改后的完整文件内容,只修改了ricean_factor这一行的值 |
- 写入文件 同样使用python中的open函数。
|
|
#4. 写入文件 |
|
|
if update_content!="":#如果修改内容不为空 |
|
|
with open(path, 'w') as file:#w表示覆盖写入,之前的内容都会被覆盖 |
|
|
file.write(update_content) |
- 总代码 整体的代码如下所示:
|
|
import re |
|
|
#1. 读取文件 |
|
|
path='./test.c' |
|
|
with open(path, 'r') as file: |
|
|
file_content = file.read() |
|
|
#2. 查找文件替换位置 |
|
|
start_index=file_content.find('chan_desc->ricean_factor = ')#起点 |
|
|
end_index=file_content.find('chan_desc->aoa = ',start_index)#终点 |
|
|
if end_index==-1 or start_index==-1: |
|
|
print('未找到待修改位置') |
|
|
#3. 设置替换文件内容 |
|
|
ricean_factor=3#假设这是要修改的参数信息 |
|
|
updata_content=file_content[:start_index]#获取这行代码之前的内容 |
|
|
update_content+='chan_desc->ricean_factor = '+str(ricean_factor)+';//待修改位置'#修改这行代码 |
|
|
update_content+=file_content[end_index:]#获取这行代码之后的内容 |
|
|
#4. 写入文件 |
|
|
if update_content!="":#如果修改内容不为空 |
|
|
with open(path, 'w') as file:#w表示覆盖写入,之前的内容都会被覆盖 |
|
|
file.write(update_content) |
3. 多行修改-操作步骤
- 多行修改思路 多行修改有两种修改思路,如果修改部分比较集中,则可直接替换一整块的字符串内容,如果修改部分较为分散,则需要单独查找修改位置,然后再分别进行替换。
- 多行修改-整块替换
|
|
try: |
|
|
with open(file_path, "r") as file: |
|
|
file_content = file.read() |
|
|
except Exception as e: |
|
|
return str(e) |
|
|
# 设置改写内容 |
|
|
updated_content = "" |
|
|
# 查找修改 |
|
|
start_index_1 = file_content.find("start_sentence")#要确保查找元素的唯一性 |
|
|
end_index_1 = file_content.find("end_sentence",start_index_1,) |
|
|
|
|
|
if start_index_1 == -1 or end_index_1 == -1: |
|
|
print("未找到待修改位置") |
|
|
return -1 |
|
|
# |
|
|
updated_content = file_content[:start_index_1]#获取这行代码之前的内容 |
|
|
updated_content += "start_sentence和end_sentence之间的sentence_1;\n" |
|
|
updated_content += "start_sentence和end_sentence之间的sentence_2;\n" |
|
|
updated_content +=file_content[end_index_1:] |
|
|
|
|
|
##此时updated_content就是修改后的完整文件内容 |
|
|
if updated_content != "": |
|
|
with open(file_path, "w") as file: |
|
|
file.write(updated_content) |
|
|
else: |
|
|
print("修改失败") |
|
|
return -1 |
- 多行修改-局部替换
|
|
try: |
|
|
with open(file_path, "r") as file: |
|
|
file_content = file.read() |
|
|
except Exception as e: |
|
|
return str(e) |
|
|
# 设置改写内容 |
|
|
updated_content = "" |
|
|
# 查找修改 |
|
|
start_index_1 = file_content.find("start_sentence_1")#要确保查找元素的唯一性 |
|
|
end_index_1 = file_content.find("end_sentence_1",start_index_1,) |
|
|
start_index_2 = file_content.find("start_sentence_2",end_index_1) |
|
|
end_index_2 = file_content.find("end_sentence_2",start_index_2,) |
|
|
start_index_3 = file_content.find("start_sentence_3",end_index_2) |
|
|
end_index_3 = file_content.find("end_sentence_3",start_index_3,) |
|
|
start_index_4 = file_content.find("start_sentence_4",end_index_3) |
|
|
end_index_4 = file_content.find("end_sentence_4",start_index_4,) |
|
|
|
|
|
if ( |
|
|
start_index_1 == -1 |
|
|
or end_index_1 == -1 |
|
|
or start_index_2 == -1 |
|
|
or end_index_2 == -1 |
|
|
or start_index_3 == -1 |
|
|
or end_index_3 == -1 |
|
|
or start_index_4 == -1 |
|
|
or end_index_4 == -1 |
|
|
): |
|
|
print("未找到待修改位置") |
|
|
return -1 |
|
|
|
|
|
# |
|
|
updated_content = file_content[:start_index_1]#获取这行代码之前的内容 |
|
|
updated_content += "start_sentence_1和end_sentence_1之间的内容" |
|
|
updated_content +=file_content[end_index_1:start_index_2] |
|
|
updated_content += "start_sentence_2和end_sentence_2之间的内容" |
|
|
updated_content +=file_content[end_index_2:start_index_3] |
|
|
updated_content += "start_sentence_3和end_sentence_3之间的内容" |
|
|
updated_content +=file_content[end_index_3:start_index_4] |
|
|
updated_content += "start_sentence_4和end_sentence_4之间的内容" |
|
|
updated_content += file_content[end_index_4:] |
|
|
|
|
|
##此时updated_content就是修改后的完整文件内容 |
|
|
if updated_content != "": |
|
|
with open(file_path, "w") as file: |
|
|
file.write(updated_content) |
|
|
else: |
|
|
print("修改失败") |
|
|
return -1 |
|
|
出处:https://www.cnblogs.com/CrazyPixel/p/17683553.html
栏目列表
最新更新
nodejs爬虫
Python正则表达式完全指南
爬取豆瓣Top250图书数据
shp 地图文件批量添加字段
爬虫小试牛刀(爬取学校通知公告)
【python基础】函数-初识函数
【python基础】函数-返回值
HTTP请求:requests模块基础使用必知必会
Python初学者友好丨详解参数传递类型
如何有效管理爬虫流量?
SQL SERVER中递归
2个场景实例讲解GaussDB(DWS)基表统计信息估
常用的 SQL Server 关键字及其含义
动手分析SQL Server中的事务中使用的锁
openGauss内核分析:SQL by pass & 经典执行
一招教你如何高效批量导入与更新数据
天天写SQL,这些神奇的特性你知道吗?
openGauss内核分析:执行计划生成
[IM002]Navicat ODBC驱动器管理器 未发现数据
初入Sql Server 之 存储过程的简单使用
这是目前我见过最好的跨域解决方案!
减少回流与重绘
减少回流与重绘
如何使用KrpanoToolJS在浏览器切图
performance.now() 与 Date.now() 对比
一款纯 JS 实现的轻量化图片编辑器
关于开发 VS Code 插件遇到的 workbench.scm.
前端设计模式——观察者模式
前端设计模式——中介者模式
创建型-原型模式


